Friday 30 May 2014

I'll Share My Heart With You Apple Pies


I was rummaging around in the freezer the other day, (because I had a craving for frozen peas) when I spotted the container I thought I'd lost buried beneath T's bread and ice cube trays. I was curious, what had I put in there? I don't freeze a lot of things, food gets eaten up too quickly in our little nest, despite there only being the two of us.
After bashing it on the table a few times I managed to get the lid off and there, despite being a little bit frosty, was the wonderful stewed apple mum and I had made when I was last at my parents house.


My mouth started watering as I remembered the tangy apples simmering on the Aga, the smell of cinnamon and cardamon drifting all about the house and the sweetly sharp taste nibbling on my tongue every time I sneaked another mouthful.

I knew I had to whip up a batch of apple pies immediately.


As I pulled flour and sugar from my cupboards I thought about T, he loves apples and tells me I don't bake with them often enough. I suddenly had the urge to bake him a HUGE apple pie, the kind that my mum bakes for Sunday tea in winter, only I'd add toffee and pecans and little paper flags.
It was a great plan, until I realised I didn't have long before he came home from work and that I also didn't have any pecans. I stood for a few minutes staring at the thawing stewed apple. OK, so maybe a HUGE pie wasn't such a great idea, with only us two it would sit for days on the side by the cooker, slowly being nibbled at until the last slice was left unwanted because the pastry would be soft.


I wanted this apple pie to say things, not big things, big things need words, but sometimes you can say the little things without words. Sometimes you can say them with pie.
When I shaped these little pies, baked them and then gave half of my apple pie heart to T, what I was really saying was you're damn amazing and I'll always think you're amazing and I bloody well love you.

So if you've got somebody who you think is the best thing since rock and roll, somebody so amazing you'd share your last apple pie with...then bake them these little lovelies, perfect for sharing.


Little Heart Shaped Spiced Apple Pies, for the ones who want to share the love.

Ingredients

Makes 4 whole hearts 

For the pastry -

1 1/2 oz Vegan butter - I use a sunflower spread because I think it gives a better flavour than a soya based spread
1 1/2 oz Vegetable shortening - this gives the pastry a crumbly, flaky texture
6 oz Plain flour
1 oz Brown sugar
Half of a nutmeg - grated
Pinch of salt
4 tbsp Water

Coconut milk to glaze 
Brown sugar to sprinkle on before baking

Use your favourite stewed apple recipe for the filling.
My go to recipe is very simple, just a couple of apples, peeled, cored and chopped, pop them into a pan with a tiny splash of water, cinnamon and a sprinkle of brown sugar to taste. Simmer on a low heat until soft and mushy, then add a few drops of vanilla extract.


To make these beauties...

Rub the vegan butter and vegetable shortening into the flour with your fingertips. Keep your hands cool and try not to get the mixture onto the palms of your hands as this will warm the fat and we don't want that!
Add the sugar, salt and nutmeg and give it a stir with a knife.
Now mix in the water until it starts to cling together. 
Bring the dough into a ball with your hands, it will be quite crumbly but try not to over work it.
Wrap it in clingfilm and let it rest in the fridge for about 15 minutes.
Roll out the dough and use a heart shaped cutter to cut out 8 hearts. I used a 4" cutter.
Now place a couple of spoonfuls of the stewed apple onto the left hand side of 4 of the hearts, and then onto the right hand side of the remaining 4 hearts.
Brush coconut milk around the edges and fold the pastry over, using a fork to crimp the sides down.


Use the fork to poke holes into the pastry, I marked mine with a heart pattern but just a simple stab with the fork will do!

Brush them with coconut milk and sprinkle with brown sugar.

Bake at 200 c for about 10-15 minutes, until they're golden all over and browned at the edges.


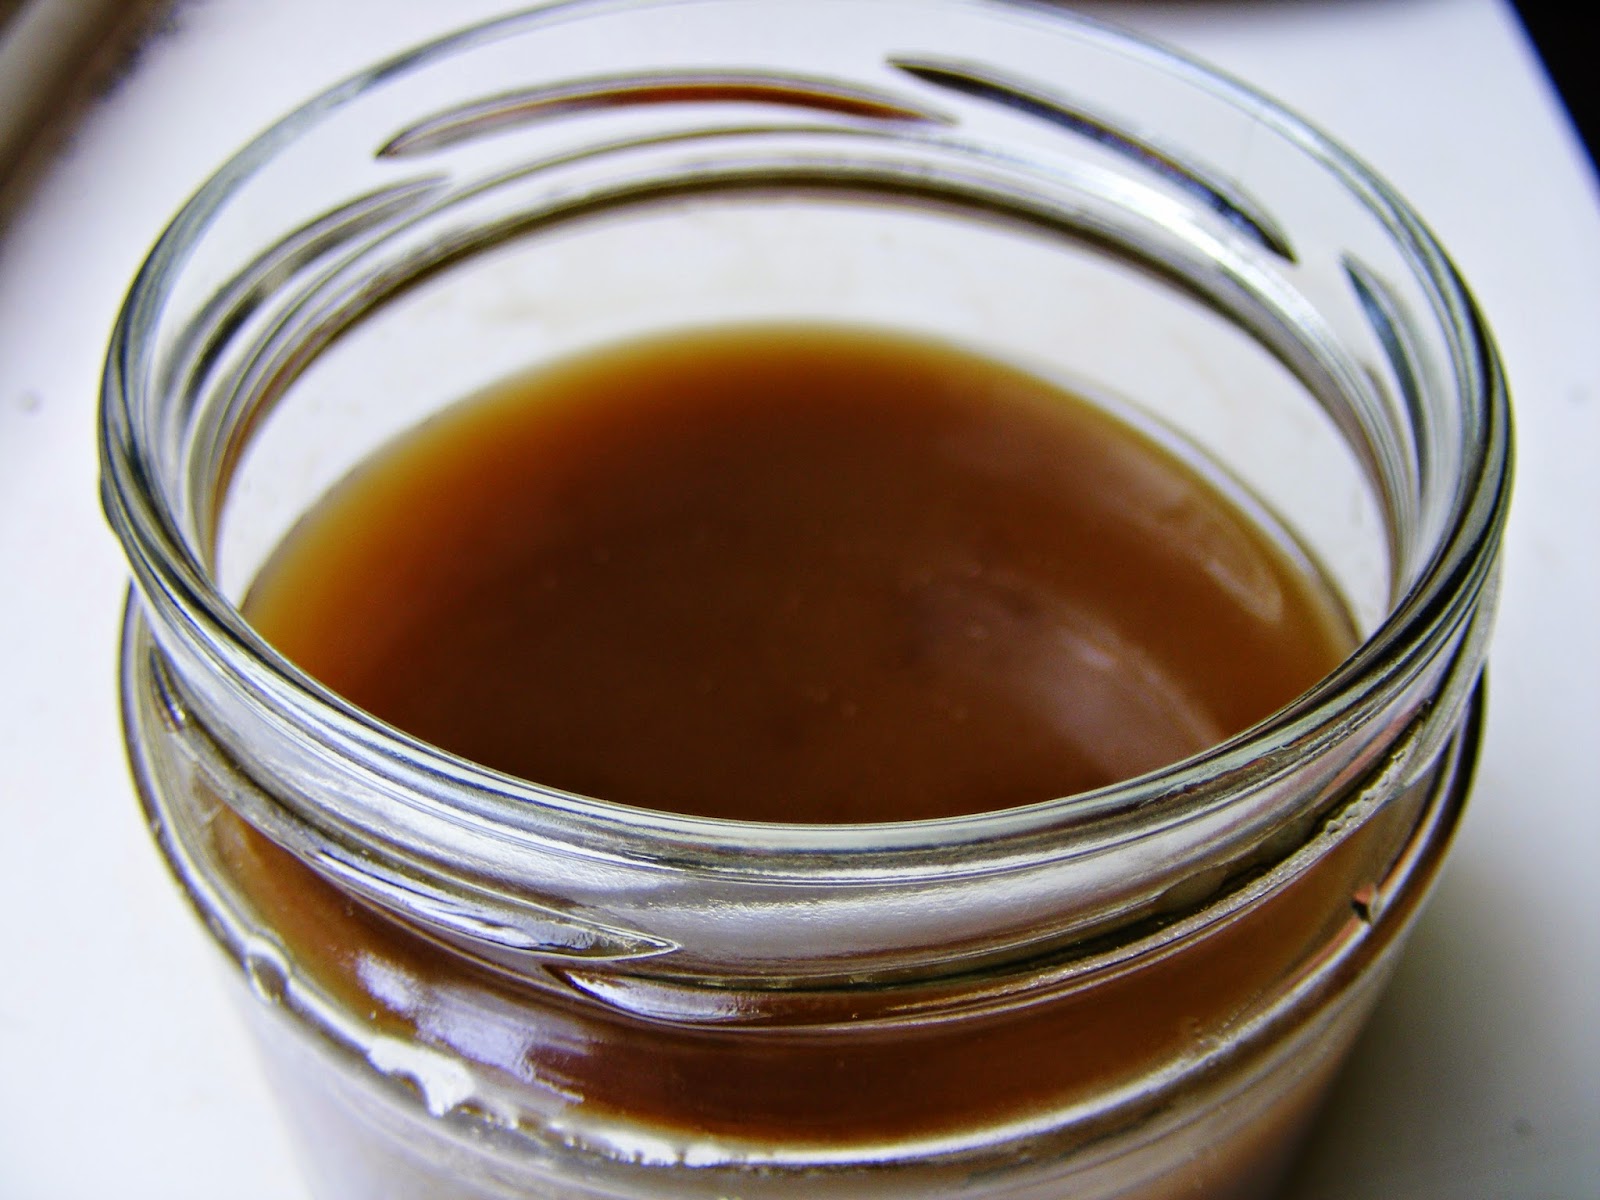
I drizzled mine with this Coconut&Rum Caramel Sauce 

Eat them with your lover or your friend or even the person you sit next to on the bus. Go on, wear your heart in your cake tin and give half away!

Happy baking! x


Thursday 29 May 2014

Garlic & Thyme Focaccia Bread...Eat Me Warm With A Smile


Mmmm, what is better than warm bread straight from the oven to the table, to be shared and teared and devoured with soup. 
This lovely little flat bread is delightfully soft and comforting, with cloves of roasted garlic sunk into the dough and sprigs of thyme scattered liberally creating a mouth watering smell throughout the kitchen.

The coconut oil works great with this bread, I rubbed it all over the top before baking it and the crust came out a wonderful pale gold. The coconut flavour isn't too overpowering, you just get a hint when you lick your lips.
Rock salt is also tasty for sprinkling over the top before baking, black pepper too!


This bread is so so easy to make, I make it or a variation of it most weeks. In fact, T loves homemade bread so much we have to fight the urge to have it with our evening meal every night. I never use yeast in my breads, partly because it doesn't agree with me and partly because it's just so much easier and quicker without it. I've used my soda bread recipe as a base for so many other bread recipes, each time adding different things and playing around with the quantities. 


So here it is, am promised...
Garlic & Thyme Focaccia Bread

Ingredients

5 oz/150g Spelt flour
4 oz/100g Plain flour
1 1/2 tsp Bicarbonate soda
3 1/2 fl oz/100ml Coconut milk - the stuff from the can, shake it up so it's not separated
3 1/2 fl oz/100ml Water
2 tbsp Cider vinegar

8 Cloves garlic -roasted in coconut oil
Large pinch of salt - and some extra rock salt for sprinkling
2 tsp Thyme - and some extra for sprinkling
Generous amount of black pepper

Coconut oil for roasting the garlic, greasing the tin and drizzling onto top of bread

Firstly, get your garlic in the oven roasting, they shouldn't take long. Once roasted remove from the oven and set aside.
Now, mix the coconut milk and water and add the vinegar. Give it a stir and set it aside.
Sift your two flours together and add the salt, black pepper and thyme.
Now pour the milk and water mixture in the flours, using a knife to stir it until it clinging together. Use your hands to kneed it lightly into a dough. The dough will be sticky and wet.

Grease your tin and your hands with the coconut oil. The oil on your hands will stop the dough sticking to them.
Now push the dough into the tray and flatten it. Use your hands to rub coconut oil over the top, making the surface uneven with little dips and hills.
Now poke the garlic cloves into the dough, sprinkle with the left over thyme and some rock salt.

Bake in the oven at 200 c for around 15-20 minutes.
Eat this bread warm with a smile on your face.


Happy baking! x


Friday 23 May 2014

Rum Caramel For My Lover


So today it's been raining, quite a lot. But I don't mind so much, I like the pitter-patter it makes just outside the window. It also means the rosemary has been watered, and I like to think that the rosemary prefers the gentle rain water to my giant jug load of tap water.
But anyway, my point was that rainy days make wonderful baking days. I always feel like I've been given an extra day, a lovely little day where I won't feel guilty for staying indoors and I can stay in T's baggy T-shirt and spend the hours experimenting, with a whisk in one hand, a wooden spoon in the other and flour covering my bare arms and legs that will inevitably end up all over the flat.


Today has been no exception. The inspiration behind this little jar of Caramel were the Little Spiced Apple Pies I made this morning....and the reason I baked Little Spiced Apple Pies this morning was because, very simply, I missed T. When we woke up this morning we wished it was the weekend so we could stay curled around each other. So when he left for work I thought I'd bake him something yummy and sweet for when he came home.


Something we could share whilst we sat on the sofa with our feet tucked up beneath us, remarking on how we could smell the rain. Something that would not only let us celebrate the beginning of the weekend, but also something that if it could, in a tiny little voice, would say 'you're amazing, and I bloody love you so damn much'.
So that's how these share the love apple pies came to be.
And once you have two perfect little apple pie heart halves, it only seems right that there should be some kind of rum caramel to drizzle?


So the recipe for the Little Spiced Apple Pie's will be here next week.....
But for now, here's the Caramel Sauce recipe so you can make it and have it ready for when you're devouring the apple pies...

Rum&Coconut Caramel Drizzle Sauce

Ingrdients

2 oz Water
3 oz Brown sugar
1/2 Coconut milk - you can use a whole can if you wish, no need to alter the amounts of the other ingredients
1 tbsp Vanilla extract
Pinch of salt
1-2 Shots of dark rum - or spiced rum works well!

Combine the water and sugar in your favourite saucepan you use for all things caramel/fudge/toffee -y.
Bring it to the boil and simmer on a rolling boil until the colour darkens and it begins to caramelize and smell fabulous.
Don't let it turn to thick caramel though!
Remove it from the heat and whisk in the coconut milk.
Return it to the heat and let it simmer until it thickens. Remember, this is a drizzle sauce, so we don't want it to be as thick as some other caramel sauces, I let mine get to the consistency of somewhere between single and double cream. Remember it will continue to thicken as it cools.
Once you're happy with the thickness, remove it from the heat and whisk in the vanilla, rum and salt. 
Let it cool before whisking again and pouring over anything you want to lick it off.
You can store it in the fridge, if it hardens you can simply warm it back up and give it a whisk before serving.
Enjoy!


Happy Baking! x


Thursday 22 May 2014

Teaser...


This is just a little teaser post...
This gorgeous Garlic and Thyme Focaccia bread has literally just come out of the oven, it's still warm and sitting on my kitchen table waiting to be devoured by T and I with leek and potato soup later.
It's soft and perfect for tearing and sharing. 
Give me chance to write up the recipe and it'll be on here beginning of next week.

Happy drooling x

Sunday 11 May 2014

Good Old Chocolate Cake With Salted Caramel Glaze


Sometimes in life, you just want a piece of chocolate cake.

Don't get me wrong, I love experimenting with different flavour combinations and ingredients as much as the next vegan girl...but sometimes, I just don't feel like being all that healthy, y'know? There is always a time for chickpeas in cupcakes and bananas instead of fat, but there is also always a time for simple, good old fashioned, no fuss no muss chocolate cake. (Veganized-of course!)


Having said that, this cake is not completely at the naughty end of baking, after all, it's all natural and vegan ingredients with no fat other than coconut. And if you wish, you could still substitute the sugar for agave or maple syrup.
The caramel...well, what can I say? I like my caramel at the naughty end.


So here you are lovelies, a gooey, chocolate cake with a hint of spice to make you extra nice...

Ingredients

Makes a 1lb loaf cake

2 oz Creamed coconut - dissolved in 12 oz water
3 floz Coconut milk
2 oz Cocoa powder
7 oz Self raising flour
1/2 tsp Baking powder
3 oz Date paste - see below for instructions
Large pinch of salt
1 tsp Espresso powder
2 1/2 oz Brown sugar
Splash of vanilla extract
Large pinch of cayenne pepper
1/2 tsp Ground cardamon
1 Batch of salted caramel - see below for instructions

Date Paste

Measure out the 3 oz of chopped dates, then pop them into a saucepan with a few tbsp of hot water. Now simmer them on a gentle heat for a few minutes until they're soft and mushy. You can use a hand blender to blend them into a smooth paste. 
Add a small pinch of salt and a drop of vanilla extract. This is like a very simple date caramel - it tastes sooo good! DON'T EAT IT ALL NOW!

Caramel

This is the simplest caramel recipe ever, it's my go to caramel.
All you need is 1 can of full fat coconut milk, 3 oz brown sugar, a pinch of salt and a splash of vanilla extract.
Simple pour the coconut milk into a pan with the sugar and heat through gently until the sugar has dissolved.
Then turn up the heat so it's on a rolling boil BUT NOT SO THAT IT'S RISING UP TOO MUCH. Keep it merrily boiling away until it reduces down and becomes thick and gooey. Depending on how high a heat you have it, it can take from 30 minutes to 1 hour. Give it a stir every now and then.
When it's thick, beat it with your wooden spoon for minute, to make it shine and then beat in the vanilla and salt.

Right then, lets get baking!

First off, pour your 12 oz of hot water into a jug and add the creamed coconut. Let it sit for a minute and give it a stir and it'll dissolve. Set it aside someplace cool.

Now grab your favourite mixing bowl and sift in the flour and cocoa powder.
Add the baking powder, salt, espresso powder, cayenne pepper, cardamon and sugar. Give it a stir with your trusty wooden spoon.

Once the creamed coconut mixture has cooled a little - it can still be warm just not boiling hot - pour it into the dry ingredients. You'll need to stir well but gently, until most of the lumps have gone.
Now pour in the coconut milk and date paste and stir until combined and you have a thick, glossy batter.

At this point you are going to have a sneaky taste test - you just won't be able to resist because the smell is too chocolatey - the danger here is that you might eat the entire mixture. So be careful.

Use coconut oil to lightly grease your loaf pan and then dust it lightly in cocoa powder.
Pour the batter in and bake it at 180 c for about an hour. The time can vary with different ovens, I suggest after 40 minutes using a cake tester or knife to check, you want the knife to come out pretty much clean, but a little bit of cakey goo is good because that means it'll be nice and gooey soft.
You can remove the cake from the loaf pan after a few minutes and let it cool on a wire rack, preferably on a window sill to make people jealous.


Once cool, simply smother in caramel, sprinkle with salt and devour.


Happy Sunday baking! x


Thursday 1 May 2014

Spicy Lentil & Chickpea Pie


Yes that's right, this is a SAVOURY recipe...and no I am not a robot posing as the real Millie and neither have I been overdosing on the sugary stuff...well, no more than usual anyway.

I was just thinking what I could cook for dinner, something wholesome and chunky and filling. I wanted something that I could bite into, something solid and satisfying. 
OK, I'll admit it, I had a craving for chips. 
But a girl can't go running to the chippy every time she feels like it, because y'know, you are what you eat. 

And I really don't want to be a chip.

But I could live with being a spicy little pie.


This pie is great, because it's quick and easy to prepare and tastes soooo good. The filling is really healthy and if you wanted to take it one step further into health-world you could simple make it into a tart by leaving the top open and only having the pastry base.

So here it is, Spicy Lentil & Chickpea Pie - for those days when only pie will do.

Ingredients

Pastry to fit a 7" tin - I used a simple vegan shortcrust pastry - recipe below.

4 oz Red lentils -cooked
1 Can of chickpeas
1 Large onion
3 Cloves of garlic
Big handful of kale - or spinach!
2 fl oz Coconut milk - and a little more for glaze
Large pinch of salt
Pinch of rock salt
Large pinch of black pepper
1 tsp Coriander
2 tsp Smoked paprika
1/2 tsp Chili powder - if you like it hot add some fresh chilies too!
1/2 tsp Garam masala
1 tbsp Coconut oil

For the pasrty...

4 oz Vegan butter
8 oz Plain flour - if you want to use your favourite gluten free flour blend then go for it! I used GF flour for this one, just to experiment, it didn't come out as golden in colour as usual but still tasted great.
Pinch of salt
Pinch of black pepper
2 tsp Basil

Just like any shortcrust pasty, all you need to go is...

Rub the vegan butter into the flour until it looks like fine breadcrumbs.
Now with a knife, stir in the salt, pepper and basil.
Add a few table spoons of water until it starts to come together into a dough - don't add too much water! Shortcrust pastry should be slightly dry, it makes it harder to work with but that way when it's baked it becomes flaky and buttery and crumbly.
Wrap it in cling film and let it chill out in the fridge for 20 - 30 minutes.

It's time for pie!

First of all, get your red lentils in a pan with enough water to cover with about an inch of water on top. Bring to the boil and let simmer until fluffy.

Whilst they're doing their thing...

In your favourite wok or large saucepan, saute the onion in coconut oil with salt.
As the onion starts to become soft, add the garlic, pepper and spices and continue to saute for another 2 minutes.
Now add the chickpeas, kale, (cooked)lentils and coconut milk and simmer for about 5 minutes, until the chickpeas are softer and the kale has wilted.

Remove from the heat and set aside.

Roll out your pastry and line your tin.
Spoon the filling into the pastry case and smooth out.
You can either completely cover the top with pastry, or as I did, cut out shapes and arrange them to look so damn pretty.

Finally, brush the pastry with coconut milk and scatter with a pinch of rock salt.

Pop the pie into the oven and bake at 200 c for about 20-30 minutes, until the pastry is golden brown.


It's lovely with sweet potato wedges or a simple spinach salad, oh and hummus is a must!

Happy baking! x